Create a Manual Receipt
To
create a manual receipt you must create the receipt, configure it, review
it, submit it. This section discusses each of the these steps. Follow
the steps below to perform the following actions:
Access the
Create Receipt screen.
Configure
the Receipt Headers.
Configure
the Remittance Bank and Customer Information.
Configure
Remittance Reference Detail.
Submit
a Receipt.
Access the Create Receipt Screen
Follow the steps below to access the Create
Receipt page.
|
Step |
Illustration |
1 |
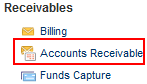
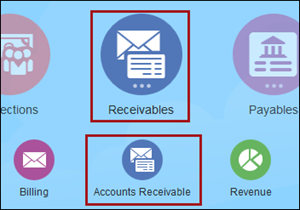
To access
a receipt:
Select
the Navigator icon and select
Accounts Receivable from
Receivables options.
OR
From
the Home screen, click
Receivables and select
Accounts Receivable. |
|
2 |
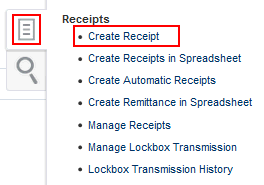
From the Accounts Receivable screen,
select the Tasks icon.
In the Receipts
section, click Create
Transactions. |
|
3 |
The Create
Receipt page appears. |
|
Configure the Create Receipts Headers
Perform the following steps to configure the
receipts header parameters.
Step |
Action |
Illustration |
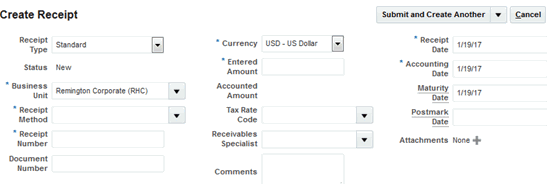
1 |
Open New Receipt. |
Note:
See How to Access the Create Receipt Page for more information. |
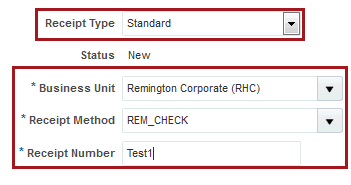
2 |
Select
the desired Receipt Type,
Business
Unit, and Receipt Method.
Enter
the Receipt Number. |
|
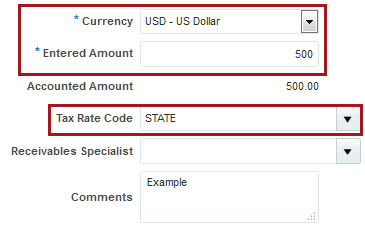
3 |
Select
the required Currency.
Enter
the Amount of the Receipt.
Select
the Tax Rate Code.
If
required, select the Receivables
Specialist.
Enter
desired comments. |
|
4 |
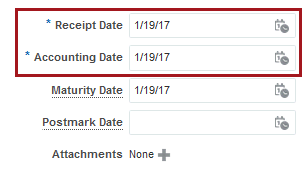
Enter the
Receipt Date and Accounting
Date.
If required, enter the Maturity
Date and Postmark Date.
Click the Add  icon to add Attachments,
then follow on-screen instructions to add an attachment. icon to add Attachments,
then follow on-screen instructions to add an attachment. |
|
Configure the Remittance Bank and Customer Information
Perform the following to configure the Remittance Bank and Customer
parameters.
Step |
Action |
Illustration |
1 |
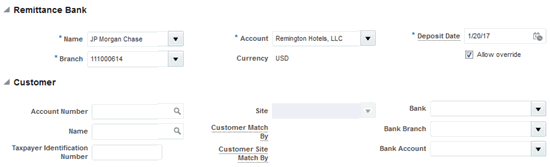
When the Receipt
Method parameter is configured (See Step 2 above), the
Remittance Bank parameters
populate.
If necessary, modify the Remittance
Bank parameters. |
 |
2 |
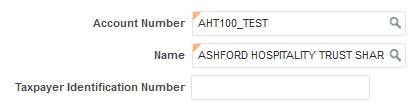
If required, enter the following:
- Customer's
Account Number
- Name
- Taxpayer
Identification Number.
|
|
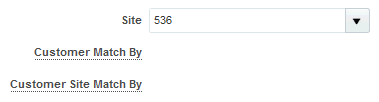
3 |
Select the Site
parameter. |
|
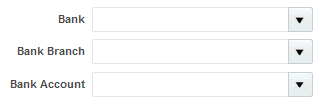
4 |
Set the Bank,
Bank Branch, and Bank Accounts parameters. |
|
Configure Remittance Reference Detail
Perform the following to configure the Remittance Reference Detail section.
Step |
Action |
Illustration |
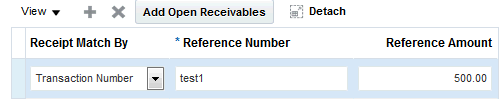
1 |
Click the Add
icon. |
 |
2 |
A new row appears in the
Remittance Reference Detail
section. |

|
3 |
Select the Receipt
Match By, enter the Reference
Number and Reference Amount
in the fields provided. |
|
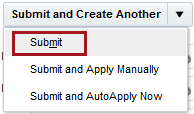
How to Submit Receipts
Perform the following procedure to submit Receipts.
Step |
Action |
Illustration |
| 1 |
Click the Submit drop-down arrow then
the Submit option. |
|
Updated 1/07/2019 JM